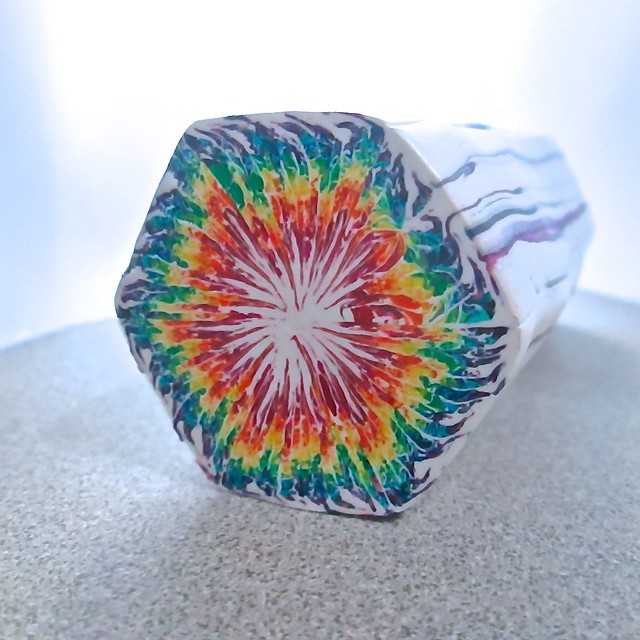
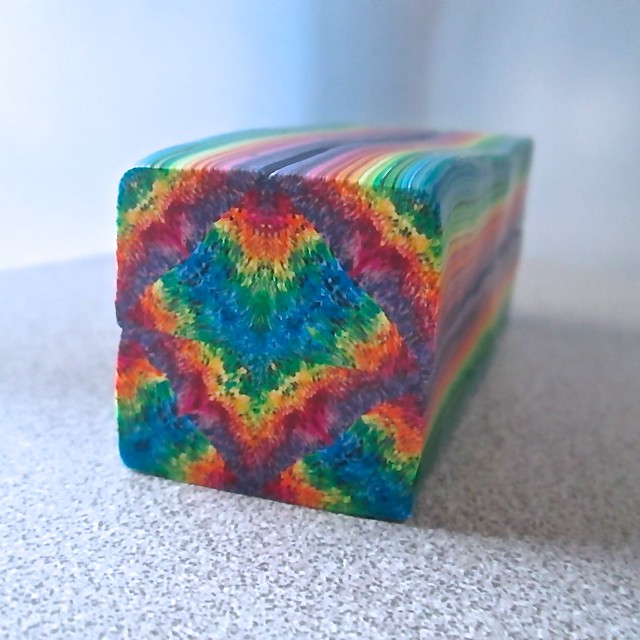
Tuesday, July 24, 2012

Polymer Clay Daily!

It's kind of funny, but I never posted about this in my blog.  I think each of us read the posts and hope for the day when it's their name and then.... I was featured March 9 - yes, that's the day after my birthday - by the premier polymer clay blog in the world, Polymer Clay Daily.  My Van Goghish cuff bracelet below caught Cynthia Tinapple's Eye and she did a very nice write up on my experiments with scraps.  I do have to say that it looks darn good for a clay hand-me-down. =) And others must have agreed because my sites got over 20,000 hits in just 2 days.  
Magic
The bracelet is rather simple in design.  I had made a series of rainbow colored canes for my PCAGOE Challenge piece and had lots of rainbow colored left overs from all the color mixing I did.  I chopped the leftovers up by color groups and stacked them next to each other - adding a few specs of chopped up black for effect.  From that colored block of stacked, chopped scrap clay, I made a Starry Night Spiral Cane ala Donna Kato - and yes, it does look very Van Gogh as Donna's name suggests. You may have already seen the variation tutorial I posted for this wonderful rainbow colored magic swirl cane on July 11. I made a few more fun canes from the leftovers that you can see on my Flickr site and then Rainbow Stroppel Canetossed all the leftover ends and bits and pieces into a Stroppel Cane - an ingenious use of leftovers brought to us by Alice Stroppel.  You can watch a Stroppel Cane demo by Alice herself HERE.  I've been tickled at the response and feel absolutely humbled by the wonderful polymer community.  I've questioned my path so many times over the past years and truly feel like I'm on the road to where I want to be.  Thank you, everyone!

Tuesday, July 17, 2012

The Joys of Extruding!

The July PCAGOE Challenge theme was "Extruded." What a fun challenge! Extruding clay has come a long way from the days of making your hands sore with the old silver extruders. My Makins Extruder is a blessing and has allowed me to play with some beautiful techniques that I'd never have tried with my old extruders. Check out these Salt & Pepper Shakers by Lisa Rapp! They are made with simple extruded snakes that are pinched and bent to simulate knitted stitches! I gotta try this - I've seen some absolutely brilliant items created with this technique! Lisa's wonderful Salt & Pepper Shakers won first place in voting by her fellow PCAGOE members.  Congratulations, Lisa!

This was my entry - one of my guitar tins made with a extruded "Klimt" background.The outline of the guitar was created from a rope of extruded gold as were the strings and the other features. They were placed on a canvas of liquid polymer and manipulated into the design and baked. The inside of the guitar was inlaid after baking using a background of extruded klimt cane with coordinating colors. After sanding the surface smooth, I added an additional layer of liquid polymer to seal the inlay and fill any gaps. It's a fun little project made with lots of extruded fun. =) I'd like to thank my fellow PCAGOE members for voting me 3rd place in the challenge! Here is a pen in a matching "Klimt" pattern.

Wednesday, July 11, 2012

Making a Magic Swirl Cane

Rainbow Swirl

Here's a goodie for using up some of your random fun scraps. I originally published this in my April newsletter. If you want to read the whole newsletter, the link is http://ymlp.com/zV9foZ. I'd love for you to post your canes or any projects you make from them on my Facebook Page!

1) Grab some piles of left over scrap clay in colors you want to blend. Make sure the piles are similar in size.


2) Chop up the different piles of scrap clay with a blade or in your food processor. If you make it too fine, you'll lose the details of the different shades, but this is a fun way to vary the look of the cane as well.


3) Stack the different piles of
chopped clay next to each other.


4) Chop up a bit of scrap black clay and divide it evenly between the piles. How fine you chop it will determine how fine the black accent streaks are in your cane. Mix the black bits into your piles and mix the piles very slightly between colors to blend them.

5) Roll and press your pile of chopped bits into a square. At this point I cut mine in half to make another cane (haven't decided which) and resquished the remaining half back into a square. It was about 3.5".

6) Run the slab of clay through the pasta machine on the thickest setting - from one color to the next as shown. You want to make sure you run it this way so that the colors run through the sheet as streaks of color. If you run it through from the edge with all colors, they will be just dots of color.


7) Take your sheet of clay and
divide into 3rds lengthwise. Stack your three long sheets.


8) Run a thin sheet of black through your pasta machine. I did this on a 5 setting when my machine goes from 1(largest) to 7(smallest). You can make it thinner or thicker depending on your taste. Stack your black sheet on one side of your colored sheet and trim the excess.

9) Roll your cane from either end - your choice - with the black toward the outside - i.e. the black will be laying against the table as you roll your cane up. Your cane is now finished! Reduce and enjoy!

Sunday, July 8, 2012

Custom Designs

It is always a bit of an honor and a challenge when you get that message in your inbox asking about custom designs. This one was fun.


The customer wanted drawer pulls for her custom laundry room. The room had tile that was white and cream. She asked about putting laundry related shapes on a white and cream checked background. I started out with my extruder again - making white and cream square logs that I stacked together with "grout" in a tan color to add separation and interest. I then created 3 canes - a clothes hanger, a clothes pin, and a jug of bleach. I covered the pulls in a base layer of clay to make a smooth bed for the pattern sheet. That sheet started with thin slices of my checkerboard cane overlaid with thin slices from my laundry room canes. The final pulls were sanded and buffed to a glossy shine. I'm looking forward to seeing a picture of them in place on the cabinets that I can share!

If you're interested in any custom items for you home, please feel free to contact me! rengalsa@gmail.com

Tuesday, June 26, 2012

It's All About the Color!

As much as my clown from my last post was about shades of gray, these pieces are all about COLOR. I've had a lot of creative ideas floating through my head, but most of the time I wonder what to do with all the leftovers after I finish my creative vision. This was the case with the clay from my Mime Bracelet that I featured in my March Newsletter. I made 3 tiny canes with my scrap - a rainbow zigzag, a basketweave, and a spiral like the tutorial I shared in my April Newsletter. From the leftovers of these three canes, I also made a Stroppel Cane. These coordinate and can be combined beautifully, but also make beautiful stand alone items, like the bangle bracelet pictured above and the perfume pen to the right. Unfortunately, my experiments with those canes is limited since they were small to begin with, but the results always give me more ideas for future experiments. Plus, the lucky buyer who grabs them from my ETSY shop will have a unique treasure.

Here are a few more fun finds from my ETSY shop using my colorful scrap canes!  Enjoy!

Tuesday, June 19, 2012

Clowning Around

It's hard sometimes to put into words where your inspiration comes from. As long as I can remember I've been creative - drawing and cutting out my own paper dolls from the moment I could hold a scissors. Every creative moment molds you and one of my pivotal ones was getting a paint by number set with two clowns - one happy, one sad. It was complex and I was very young, but my mom knew I needed the challenge. I was fascinated with the face painting, the expressions, and it began a love affair with the human face and capturing emotions with concepts and design. In starting this latest line of polymer art, I wanted to get back to those ideas that inspired me in my youth.

These earrings are called "Rainy Day at the Circus." They have a translucent sad clown face on a black, gray & white pixeled background. I wanted the gray back drop to represent the gray of the rain in contrast to the bright colors in the clown's nose, hair, and flower. They were my entry in the May PCAGOE challenge - "Artist Inspired." And it's not what you may think, I wasn't inspired by the artist who painted the original painting that paint-by-number from my youth was based upon. When I thought about it, the artists that inspired me were the clowns or more specifically the clown that most of the sad, tramp clowns were based upon - Emmett Kelly or "Weary Willie."
Here are details from the matching cuff bracelet and mini salt and pepper shakers.  The 3 matching pieces are for sale in my ETSY shop.  Click on the links to find them:

Friday, June 15, 2012

My Pansy Butterfly Cane

There are a bevy of beautiful butterfly canes out there and just as many instructions on how to make them - from the simple to the complex. Mine is based on the techniques found in my Pansy Cane Tutorial, but can be used with any Skinner Plug or even a rounded Ikat Cane. As always please share anything you create on my Facebook Page! I'd love to see your work, too!

1) You'll need two color coordinated canes to begin with. One that is approximately 3/4" x 6" and another slightly smaller. I used half of the canes that I used to make the Passion Flame Pansy cane that is pictured at the bottom of this blog post.

2) Mix a dark color that coordinates with your cane, but is a shade darker or you can use black. Make a sheet of this to wrap both of your canes.

3) Also make two bullseye canes with white (or light colored) centers and your dark mix from 2. Make the canes with different sized centers.

4) Cut off a 2" section of your larger cane and set it aside. Reduce the cane to 5/8" and cut another 2" section. Reduce again to get 2" sections that are 1/2", 3/8", and 1/4".

5) Reduce your smaller cane to 1/2 and cut off 2 2" sections. Reduce it again to 3/8" and cut off two more 2" sections.

6) Shape your sections of your longer cane into long teardrops and stack them together longest on top to smallest. Place varying sections of both of your bullseye canes along the outer edge.


7) Shape your sections of smaller cane into elongated teardrops and place the longest ones in the center and the shorter ones on the outside. Attach varying sizes of your bullseye canes to the outer edge on this wing parts well.


8) Place your wings together. At this point you can use them as is or reduce them and cut them in half and add a body to the center. Fill as needed with translucent.

9) Enjoy!

Here is the Passion Flame Pansy Cane that was also made from the same canes that I used to create my Butterfly wings! Holler if you have any questions! This tutorial was originally published on my monthly newsletter. You can find the whole newsletter HERE or SUBSCRIBE!

LinkWithin

Related Posts with Thumbnails