Sunday, December 29, 2013

The Beach & Sky!

Teaser #3   
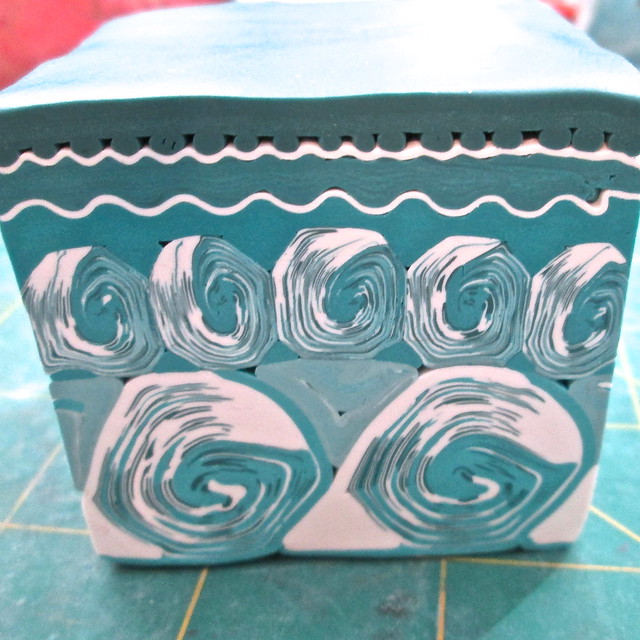
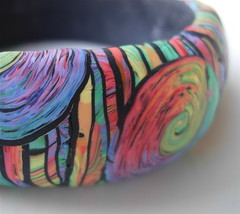
So far, we've created our bangle form out of scrap clay (doesn't that always feel good) and made some wonderful waves for our polymer painting using our Water Cane! Well, when you're painting a tropical paradise, you also need a beach and a wonderful tropical sky.  These are the easiest two steps in creating my polymer bangle, but are absolutely lovely when all put together. So here it goes!

Sand Cane

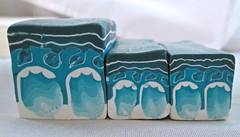
  This is extremely easy to make!  All you need is an extruder and a variety of colored clay!  I used white, brown, tan, beige, and ecru in my mix. 1) Condition each color clay and run them through your extruder using your finest spaghetti disk with multiple small holes.  Sand CaneThe next teasers
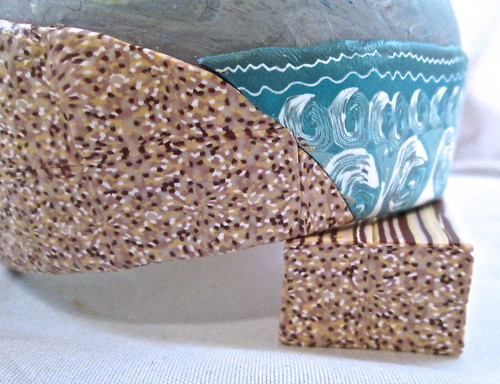
You only need a couple of inches of each color - depending on how large of a cane you want to make.  I made about twice as much of the medium hued colors than white or brown.  And feel free to mix colors to add more variety to your sand.  2) Mix up the different colors and shape them into a rectangle and then 3) reduce and re-stack the rectangle until you get your sand as fine as you want.  Now, just slice and create your beaches!!  It's pretty much as easy as that!  Now if you want, this would be fun in yellower shades or more rosy shades or even in greens for grass!

Tropical Sky Plug
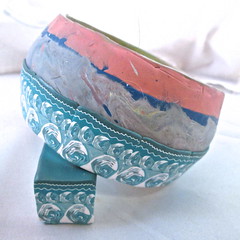
   This is also a wonderfully simple multi-colored skinner plug that truly is the finishing touch to our tropical paradise back-drop.  It's made up of 4 different colors - blue, turquoise, white, and fuchsia.  You'll see a simple layout of it at the photo at the right.  1) For mine - I started with a 3 1/2" square of turquoise. 2) I cut out a 2" triangle to the top corner on the right for my dark blue (so a 2x3.5" right triangle of dark blue) and placed it against the turquoise like shown.   Tropical Sky Skinner Plug
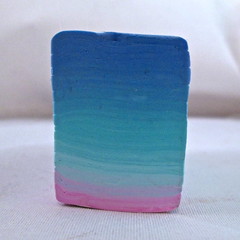
3) I cut out a 1 1/2" triangle from the turquoise on the left side to the left top corner for my white triangle (so a 1.5x3.5" right triangle of white) and then placed  it against the removed section of turquoise on the left side as shown.  And finally 4) I cut and removed a 1/2" triangle of white from the left side to the top corner and replaced it with a fuchsia triangle (a 1/2x3.5" right triangle of fuchsia).  5) Use your fingers to make sure the clay is securely blunted up against each other and run through the pasta machine starting with the bottom edge of the blend pictured in the photo.  Fold in half and continuing running through your pasta machine like a normal skinner blend until you get a smooth transition between the colors.  6) Now make a plug! Take your finished blend and fold into 3rds matching up the colors and run through the pasta machine on your largest setting and then on a smaller setting to get a long thin blended sheet that goes from pink on one end and blue on the other.  Fold it up accordion style in 1" sections to get the plug shown in the lower picture.  Here is a great tutorial for making a skinner plug: http://www.tooaquarius.com/tutorials/skinner-blend-plugs/ if you need to see it.  =)  Elaine shows to fold it in half, but with this small of a plug, I use 3rds.  Now just add your sky slices to your water and beach, cutting out sections for the taller hills.

And there you have it - a perfectly painted polymer background for our tropical paradise!!!

Saturday, December 28, 2013

Gone Fishing!

Seasons Fishing Lure/Pendant
  You know, it just ain't fair!!!  My family in Minnesota is heading up to our cabin in the Superior National Forest for New Years and I'm stuck HERE!  *sigh*  Check out this picture my sister Rita posted to Facebook on Friday - is that not a little slice of heaven?  The white expanse you see past the trees is the lake all frozen over.  The picture is taken from the cabin as it faces the lake.  Gads I miss it…  well, the beauty, the people, and the fishing - the snow and cold, not so much. And yes, the ice over the lake is solid enough to walk, snowmobile, drive and definitely ICE FISH on. Well, at least I can dream of fishing as I create and what better thing to create than polymer clay fishing lures!!!
Dumbbell Lake, Minnesota
  Why fishing lures?  Well, it started out with my last trip up north.  I was out fishing and there is always old lures and odds & ends on the boat.  Most are metal and rusty with age or wood and the pretty painting is fading and the wood rotting and I thought - polymer clay.  I mean why not, right? And these cute little boogers are a fun fashion statement as a necklace, but really they are designed to be a very durable and useful LURE.   The wire that attaches to the hooks and line is imbedded as a solid armature within the clay - all one piece!  And the clay itself is far more durable and strong than wood and should hold up beautifully for a lifetime, if not longer.  I think I'm going to have to force folks to actually use them as lures, though.  I gave my Mom one for her birthday and she's too afraid she might lose it to a fish.  lol  I'd be curious though as to how well the clay holds up to water, temperature, etc….  or if it might fade with time like other plastics are known to do.  I guess only time will tell! In the mean time, I'll be making more… and some earrings, too! And yes, I'll be toning down the flowers to make some more masculine lures as well. =)

Metallic Klimt Fishing Lure/Pendant

Friday, December 27, 2013

The Water Cane

Water Cane      Let's start at the very beginning.  In the words of Rogers & Hammerstein - it's a very good place to start.  =)   I'm thinking of a tropical paradise and the one thing all tropical paradises have in common is water.  Beautiful, teal blue water with waves splashing against the shore.  And that's the starting inspiration for this cane.
     My last post was our foundation for what's to come and now that you know how to make your bangle canvas, it's time to create some canes to start our polymer clay painting!  As with most canes, I start out sketching out the idea and then going through a trial run.  Most of the time I am pretty successful the first go, but not always.  I wasn't very happy with my first go at a water cane.  Here it is - YUCK! Well, I guess it's not horrible, but it's not something easily teachable or reproducible.Water Cane So I refined it to have more detail in the waves themselves and to have more definition between the different layers of waves so they seem to fade toward a horizon.  I did this by using a modified ikat cane for the base component of my waves.  I first read about an ikat cane from Donna Kato.  It is basically set up like a Skinner Blend, but not blended, modified and stacked to show all the variation within the layers.  Here is the starting layout.  We start out by making two of these blends - one larger for the bottom set of waves and the second smaller for the middle set.  I stopped at two sets, but if you were doing a very large project you could continue stacking smaller and smaller wave sets by reducing the size with every later and adding more waves as you fade into the background.  For my purposes, two layers of waves was the ideal amount!  You can find the detailed tutorial available as of today on my ETSY shop HERE.  It is slightly modified from the original photos to add corrections that I wanted to implement to refine the cane.  And now to slice my cane and "paint" the water on my bangle form!  In my next post we go fishing and then on to the sky and beach!!!
Bangle Teaser

Thursday, December 26, 2013

Scrap Clay Bangle Forms

Scrap Clay Bangle Forms Merry Christmas Everyone!!  In this time that we celebrate our family and friends, here is a little gift to all of you from me.  =)

I've read all sorts of posts and tutorials on the net about how to make bangle forms for use with clay, and have come up with my own system that I will share with you today.  Hopefully this will be as easy and straight forward for you as it is for me.  It's my first step in creating any bangle - including my Flamingo Paradise Bangle - which is the subject of my upcoming blog posts.

Here it goes!  You'll need:
scrap clay
an empty soda can
pasta machine
sharp blade

1)  Condition and blend your scrap clay into an even mixture.  Run it through your pasta machine on the largest setting and cut off a length to wrap around an empty soda can. You can make it any width you want - for mine I made it 3" to give me extra room to make my scene, but the photos show the technique using a 1" wide bangle.  Cut the ends at an angle so they overlap - this will give this joint more strength than if you use a blunt cut.  Blend the seam well and bake for 25 minutes at 275 degrees.  Cool in an ice bath and remove from the can.  Sometimes you may have to press the can in a bit to loosen your form. (You can see the dings in my can from doing just that - time for a new can!)


2)  Make a long log of clay 1/3 of the width of your bracelet.  For example, if you're making a 1 1/2" bangle, make a 1/2 log of clay.  Wrap this long around the center of your bangle, cutting the ends at an angle and blending the seams.  Flatten this log with your fingers to get it adhered to the clay well.  If you have difficulty with this, rubbing some liquid clay on the baked form or Kato Poly Paste will help, but use as little as possible to keep the clay from sliding all over.  Once you have the clay pressed and adhered to the middle of your form, roll it on a flat surface evenly and gently to spread the clay out.


3)  Use your fingers to start tapering the edges of the clay log towards the edge of the bracelet form.  Roll the form at an angle from the edge to the center on both ends to smooth the taper.  Repeat rolling from the center, tapering by hand, and rolling on the edge until you get a smooth evenly tapered bangle form.  Bake another 25 minutes at 275 degrees - increase the time if you do an extra large bangle that is over 1/4" at the center.


That's it!  Now you're ready to add cane slices, clay veneers or whatever you want to create your own design.  Most of the time, I add slices directly to my form, but if the canes are older or the clay is stiff, I'll coat the form first with liquid clay or Kato Poly Paste.

Here are a few bangles I've made using these very handy forms made from scrap clay.

Stroppel & Strudel Chunky Bangle
Magic Swirls Chunky Bangle

Monday, December 16, 2013

The Flamingo Cane

    It's always funny how inspiration starts.  Sometimes it's from someone else's post, sometimes it's from a picture in a magazine, and sometimes it's from a custom request from a customer.  I don't think I'd have ever thought of doing a flamingo cane if I hadn't been asked to make a crochet hook with flamingos and I never would have anticipated how popular they'd become.  I have both my Flamingo Cane Tutorial and some canes in Pink and Salmon for sale on my ETSY site.  I really have enjoyed all the responses and want to thank everyone for their support and encouragement.
My Flamingo Cane
    Most people are daunted by how the cane looks, but the cane itself is fairly easy to make.  A skinner plug creates the body, neck, and head.  The wing is just a collection of stacked feather canes.  The tutorial goes through the process in detail and lets you know the exact proportions to divide the skinner plug and feathers into to create the cane.  The feather cane by itself is quite lovely and I used some of my leftovers to make some fun Grommet Beads for Pandora style bracelets.  I then made some leg canes so I could swap out styles with the body.  They look great together!
Flamingos - legs and all!     This is just the first cane in a series of new canes and new tutorials that I am working on for a bigger idea!  In the next few weeks, you'll have some other fun things to try with me!
     I want to thank the ladies of the Denton Benefits League in Denton, Texas for their hospitality yesterday at their Tea & Trumpets Charity Ball.  Ellen Sawko contacted me on ETSY to attend as a vendor at the event.  This was their first year planning this event and they pulled it off in style.  I was very honored to be there and very impressed by how well they all contributed to the success.  Thank you, Ladies!!!


Saturday, December 14, 2013

The Dragonfly Cane

The Dragonfly Experiment     Ok - it's past time to return to my blog and what I love.  It's been over a year since I last posted and it feels in a lot of ways like I'm starting over…and I guess I am.  And I've learned many lessons, the main one being that no matter how hard you work, if you're not living the life you want - it doesn't help you're sense of self.  And in finding myself again, hopefully I'll find something that you'll enjoy as well.  =)
     I'm going to start out with my Dragonfly Cane.  As you can see from the photo at the right, I sketch out most of my more complicated designs before I start to work. It also makes a great background for my unpacked cane.  This started as an idea in my head when I made my first Butterfly Cane for my left over pieces of one of my Pansy Canes.
     It started out fairly easily.  Each vein in the wing is a small piece of the cane I use for my pansy cane petals.  The dividers between sections are gold wrapped with black with darker sections that are gold darkened with a bit of black and wrapped.  The tail of the body is made from a gold/black Skinner plug divided into sections and wrapped with black. The body itself is different sized sections of gold or darkened gold wrapped in black.  The eyes are lots of small bullseye canes of pearl wrapped in gold, surrounded by black.  That's the cane in a nutshell, but putting it together in the right proportions is much harder.  Eventually after a few more goes at it, I'll put it all into a tutorial for the brave at heart.
Dragonfly Cane    Here is a finished cane wrapped in translucent.  Since I was just experimenting, I only started out with the pre-reduced cane being 1" deep to over 6" wide.  Needless to say it was a challenge to reduce, but I wanted to see how it all came together.  Even so, I love the results and will have to make a few more in different colors and maybe use silver instead of gold as well for a different look.  The results when used together with my Pansies and Butterflies are beautiful!  I'm wanting to try a grayscale pansy and butterfly and I think a dragonfly cane would be a nice addition to a grayscale set.  I think it would be stunning to have an item in grayscale pansies and butterflies with one colored pansy, butterfly, or dragonfly for POP!
Spring Green Mini Stylus Pen w/Dragonflies
     The weather here in the Dallas/Fort Worth area has been odd this year, but then it's been odd all over.  The ice from last week's ice storm is finally melting with yesterday's rain.  It was hard getting around or walking the dog since the ground was like an ice rink.  She was a trooper though and dug her claws in.  I wish I had claws… but I only ended up on my butt once when I made the mistake of wearing tennis shoes rather than something with a heel that will poke into the ice.  In all the years of living in Minnesota and Texas I've never seen anything like this and hopefully this won't be something I see again - at least not anytime soon.  I miss the gentle Minnesota snow showers.
    I'll be back soon!  =)

LinkWithin

Related Posts with Thumbnails