Friday, October 10, 2014

Dragonscale Gems

Dragonscale Jewelry   FINALLY!!! Life is known for throwing you a few twists and turns in your plans, and I had hoped to have this class up a month ago. As the saying goes though, better late than never!
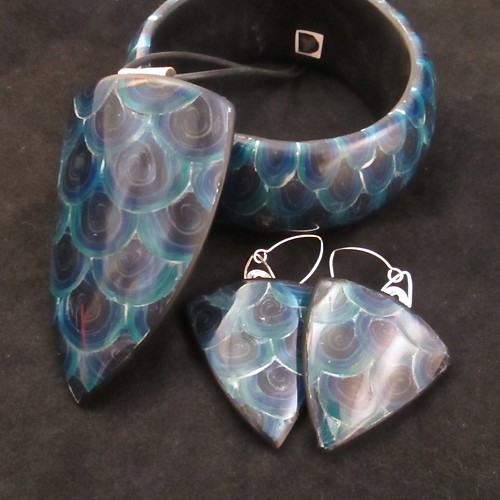
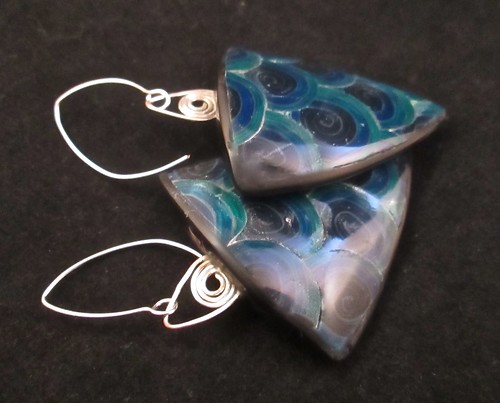
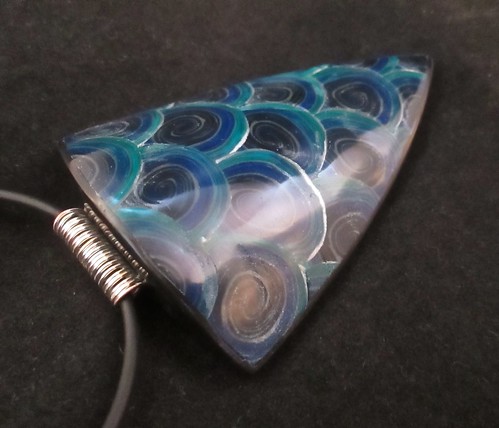
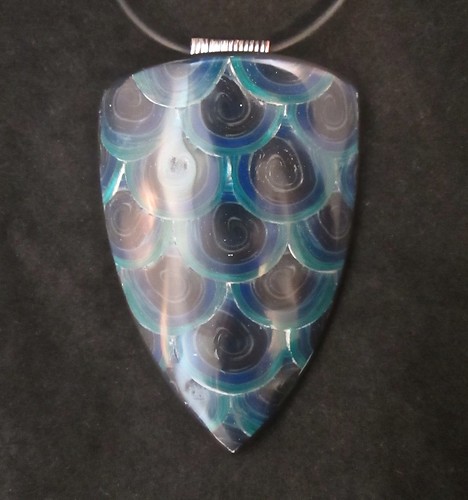
   Dragonscale Gems is my new class on CraftArtEdu and my first full class.  I released two free classes un August.  I'ven been working on this class since mid August along with another very detailed class that I hope to finish in the next few weeks.  This class is a great class for anyone who has caught the polymer clay bug and wants to learn some simple, useful jewelry making techniques.  It includes instructions on how to make a deep blue pearl dragonscale cane using Kato concentrates, how to make a beautiful pendant and earrings using simple templates. how to craft wire bails and earwires, and how to cover a scrap clay bangle form with your dragonscale cane to make a making bangle.  You can customize the techniques learned in this class by changing the color of the dragonscale or even using different canes altogether using the jewelry templates.   Use it to grow your skills and make some trendy jewelry at the same time.  You can find the Dragonscale Gems class at the link HERE.
Dragonscale Earrings Dragonscale Pendant
Dragonscale Pendant Dragonscale Bangle

Thursday, October 2, 2014

Catching the Moon

  I've been working on a pretty big project lately that has me experimenting with several new ideas that I'm hoping will come together in a wonderful, miraculous way.  One of those ideas is a Moon Cane.  There are several design questions that need answering in making this cane.  What color do I start with and will it look more realistic with the light being in the center or on the outside?  I want this cane to be extremely easy to make so how to I make the concept of craters or shadows look realistic without making the cane piece by piece like I would a picture.  What is the proper balance of light to gray in the shadows so they're visible but not focal?
   My first trial was a miserable failure!  Though I like the colors of the piece and overall design, the moon didn't look anything like what I was picturing.  I started with two skinner blends, one yellow and white and the other yellow, white and black with the black being darker toward the yellow end.  I tried to shape where I cut out the shadows and  obscure the edges with bits of my darker end of my skinner blend with the black, but the darker blend was too much of a contrast and the edges too distinct.  You can see the results in the little piece to the right and the finished piece below.
Owl in Moon experiment  My second attempt was a success, as you can see from my finished trial piece above.  The cane doesn't make an exact duplicate of the moon, but gives a good artist likeness for my jewelry pieces.  The following tutorial will be part of my upcoming CraftArtEdu class, "Midnight Owl Inro."  It's a very detailed class made for those of you comfortable with caning and looking to advance your skills.  It included instructions on how to make a custom inro form, how to make the owl that is pictured in the pieces on this blog post, how to make a moon cane and various other simple canes, and then how to put them all together in a very detailed, layered millefiori inro.
   Today though, I'm going to share with you the instructions for my simple moon cane.

THE MOON CANE

1)  Roll out a 2 1/2" square sheet of white clay on the thickest setting of your pasta machine.  Cut a 1/4" right triangle from the bottom edge as shown and replace it with yellow clay.
2)  Form your Skinner blend into a plug with the yellow in the center and the white toward the outside.  Flatten the plug to 1/2" height.
3)  Roll out a 2" square sheet of white clay and cut out a 3/16" right triangle and replace it with yellow clay.  Lay two 1/16" black snakes across the blend to tint it toward the gray.  Accordion fold your tinted Skinner blend into a block.  
4)  Cut two 1/4" circles from your Skinner Plug in the upper left corner and one 3/16" circle in the lower right corner as shown.  Make 3 short cuts from your upper two circles, one in the far right upper going to the right and two in the left going down.
5)  Using a small rod, open the cuts and stretch your openings into a moon shadow shape.
6)  Chop up the circles you removed in step 4 and half the tinted Skinner block into a fine pile of mixed colors.
7)  Pack your chopped up mix into your moon shadow openings.
8)   Reduced the cane and create!  You'll notice in the picture that by using a chopped mixture you will get a random pattern to every slice on your cane, but it also gives soft edges and a hint of shadow and texture. This is a very small cane, but if you were to make a larger cane, the shadow and texture would be finer with more shadow definition.


LinkWithin

Related Posts with Thumbnails