Friday, February 19, 2010

Classic Elegance

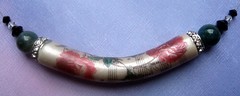
Image transfer is a polymer technique that I have played with only sparingly, but Linda Riopel has it DOWN! The beautiful focal bead on this lovely piece is made of polymer clay and the rose and music design is then transferred onto the clay before it is cured. And the results are breathtaking. I love the simplicity of this design and the curve. It's a wonderful piece that can be subtle and worn with most necklines, but at the same time very eye-catching! And the roses are so wonderful for spring, easter, and mother's day gifts! Linda is another cornerstone member of PCAGOE. Not only is her jewelry amazing, but she also is so very helpful and wonderful. She makes PCAGOE feel like a home. You can find more of her wonderful creations HERE or follow her blog at http://www.nkdesignslindariopel.blogspot.com.

Linda makes very wonderful one of kind pieces! Go get yours today!

The sun has been shining and life is wonderful. I have so many good things going on in my life and so many wonderful people - including a few new ones that have become very dear to me. PLUS yesterday I found out that my work will be featured in the reader's gallery in an upcoming issue of Polymer Clay Cafe and on doing some research on google, I discovered that my Piano Girl painting on Imagekind has been hitting the top pages on the popular tab regularly since I uploaded it! It even reached the #1 spot on page 1 at one point! I guess I need to take up my paint brushes again soon! I've gotten my UT cane reduced and some beads cured, so tomorrow you'll get to see some additional pieces. Tonight I have my friday night class with my young students - we've been working on some clay sculptures (see photo of their bunnies above) and are currently doing a clay seal. They do fabulous work for being in 5th grade and have so improved in the 9 months that i've been teaching them everything from sculpture to perspective to drawing to color & painting. Art is such a joy to learn. And I learn so much from teaching them, too!

Wednesday, February 17, 2010

Making a UT Cane - photo journal

Ok, this is a first for me, so please, please post any suggestions, comments, improvements, etc and let me know if I'm explaining things clearly. Thank you all in advance!

Supplies
White Clay (I used a mix of Premo, Sculpey III, and Kato for this - about 9 blocks total)
Orange Clay (I used Premo Orange and Sculpey III Sweet Potato - about 12 blocks)
Brown Clay (one block each of Premo Burnt Umber and Sculpey III Terra Cotta)
A long tissue blade or clay blade
A pasta machine

1) First off, prep the clays. Mix and condition the white first and set it aside rolled out in large sheet on the #1 setting on the pasta machine. Then mix the burnt orange clay in the following ratio: 1 block Premo Orange, 1 block Sculpey Sweet Potato, 1/8 block Premo Burnt Umber, and 1/8 block Sculpey Terra Cotta.

2) Stack sheets of burnt orange clay 4 high (#1 setting) and trim them to a height of 4". Lay them out on end in the center part of the 'U' and trim the top even with the lower edge of the bars on the top of the 'U' and shave the bottom with your clay blade to match the curve of the 'U'. Add a small 2 sheet stack (also 4" high) to fit between the bars on the 'U'.

3) Stack 3 large sheets of white clay and trim them to a height of 4". Wrap the sheets of white clay around the burnt orange center and trim the clay to the lower edge of the bars on the 'U'. See Above.

4) Make your bars on the top of the 'U' using your 3 sheet stack of white. Press a flat edge up against the burnt orange bar you made in step 2 and cut it to size with your clay blade carefully or measure the width needed and cut to size then press in place against the center orange bar. Repeat for the opposite side.

5) Score cutting marks on the top and sides of your cane from your pattern where the top and bottom edge of the 'T' bar meet the sides of your cane and where the stem of the 'T' comes out on the bottom of the cane. See Above.


6) Carefully trim away the scored area where your 'T' will go using firm pressure and a slight sawing motion. Once you have your sections divided, carefully clean up the edges with your blade making sure they are flat, even and parallel. Do not press or distort the individual pieces or your design with no longer line up.

7) Smooth the flat edges carefully to avoid air bubbles when you reassemble your cane. Set your trimmed pieces back on your pattern to make sure the pattern still lines true. Gentle mold it back into alignment if it doesn't. Now go get another cup of coffee. =) WAIT...that's a good idea....brb.

8) Ah...coffee.... Ok, now back to your 3 sheet stack of white trimmed to 4" height. Place your white sheet stack to fill the gap for the upper bar of the 'T'. Trim it even with the sides and press the top firmly against it while avoiding any distortion.

9) Place your white sheet stack between the two bottom cane sections for the stem of the 'T'. Trim it flat on the top and let the stem extend down past the bottom for now. Line up the bottom part of the cane with the top section and firmly press it in place making sure that the edges are even and all the lines still line up. See Above.

10) Measure and cut your two side bars for your 'T' from your stacks of white clay and place on the sides, making sure you line up the top edge of the side bars with the top edge of the 'T'. Press firmly into place. Carefully score the stem of the 'T' at the bottom of the cane where it meets the top edge of the bottom bar, then trim away the excess clay. Make sure your bottom edge is smooth and even to avoid air bubbles.

11) Carefully fill the section between the side 'T' bars and the bottom stem with sheets of orange clay. Layer and cut the sheets to size, smoothing as you add them to avoid trapping air. If you do trap air, use a fine needle to pierce the clay and smooth the hole closed. Build up the clay one sheet at a time, sealing the edges to the bar and stem until the clay is higher than the bottom stem, then use your clay blade to trim the bottom edge flat. Measure your bottom bar from your 3 sheet stack of white clay and press it into place.

12) Finish filling the remainder of the cane with orange clay until you reach your desired size. You can use layers of sheets like I did or use rolls or blocks and press them into place. Just be careful when adding additional clay to avoid distortion of your design if the clay of the design is still softer than the clay you may be adding. For my cane, the finished dimensions were 3.75 x 3.75" with a height of 4". Now it's time to reduce (but more coffee first)!

Thank you all for reading! Again, please post any comments, corrections, or suggestions. I'll post photos of the finished pieces once I get that far. =) Have a great day!!!

Tuesday, February 16, 2010

Lynda's Fabulous Faux


LOOK AT ALL THIS! Lynda Moseley is as creative as she is generous! This is some of her more recent faux gemstone work, but her image transfers, embossing, and various other creations are just as lovely and so classy and sophisticated ....well, who wouldn't want them? Lynda is one of the cornstones of the PCAGOE and it always helping out with advice, donations to causes and support with team promotions. You can find more of her work HERE and she also has a wonderful blog at http://www.scdiva.blogspot.com.

PLEASE check out her shop, you won't regret the visit. Her work is fabulous!

Well, I sat down with girls and watching Harry Potter saturday night and while sitting enjoying the show, I threw together a few odds & ends pieces from some beads I'd made cleaning up my workspace and using up clay left over from other projects. Nothing terribly fancy, but throw together with some chalk turquoise and some colorful pick glass beads, they make a nice presentation. Ok, back to work! The sun is shining!

Monday, February 15, 2010

March PCAGOE Challenge Prize Pool

LOOKIE AT THE NEW GOODIES! Vote for your favorite entry in the March PCAGOE Challenge, the theme of which is "Texture" between March 1 and March 7 and you could win one of these beautiful polymer clay prizes created by our talented member artists! Vote at www.pcagoe.com

1st Row, L-R: StudioSChiek, PolymerClayCreations, ClayCenter, KDollDesigns
2nd Row, L-R:
NKDesigns, RenGalSA (omg - that's ME), AshPaints, BeeTreeByMe
3rd Row, L-R:
11BoldStreet, AlisonEKurek, RiverValleyDesign, LaurelSteven
4th Row, L-R:
Juliespace, JanGeisen, ClayHappy, SCDiva

Yes, that's right! One of my pins is included in the prize pool this month! Make sure you vote!


Well I got some lovely new Longhorn Jewelry posted on my Etsy Store! I've been working on a UT cane now and am almost done. I've been photo-journaling it so you'll get to see all the various steps! Hope everyone had a wonderful Valentine's Day.

Friday, February 12, 2010

Polymer Clay Pen

This wonderful clay covered pen and stand come from Kelly Feeney of Kellyplaysclay. Kelly has been an inspirations to me since joining PCAGOE with all her hard work and her wonderful attitude. She's always there with a encouraging word and a chipper wit. I wish I could bottle her enthusiasm for my own personal pick me up. =) Her shop is a floral bouquet! You'll find not only lovely pens like this one, but barrettes, pony tail holders, and the most adorable decorated sugar packet holders! Kelly is a busy mom like I am, so I admire her dedication most of all! You can find Kelly's shop HERE and more info about PCAGOE at www.pcagoe.com.

The pen set would be a wonderful gift for any mother, teacher, or mentor. Give Kelly a look!

Oh, it's Friday isn't it! Well, the gloom here is supposed to break but it's still very cold. I've been hovering near my space heater as I work - with my cat and dog not far away enjoying the extra heat, too. Today I should have enough light to do some photojournaling while I'm making my UT cane then I plan on posting it as a kind of 'how to' this weekend or early next week. Y'all are my guinea pigs for developing my own tutorial writing style. Here is a fun picture of some of my longhorn beads fresh out of the ice bath. I'll probably do some quick earrings this morning while waiting for sunshine to light up my work area a bit more for picture taking. Have a great day, everyone!

P.S. I've just started a fan page on Facebook. Please feel free to become a fan HERE so I can keep you up to date with any new shop items or promotions! Thank you!

Thursday, February 11, 2010

Triangle Necklace

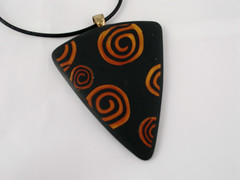
Isn't this simple yet stunning? Sarah from Creative Art Center dazzles us with the simple use of color in this wonderful necklace! The lines are so clean and the triangular shape such a fun contrast to the glowing red swirls - it's definitely a piece that would catch eyes and start conversations. Sarah's work involves polymer clay jewelry and sculpture, but she also does graphic designs and photo restorations. I love the geometric lines and shapes in her jewelry pieces! You can find more of Sarah's jewelry in her etsy shop HERE. Sarah is another fabulously talented member of PCAGOE.

Enjoy!

Well, it's a rainy, cold, messy, icky day here in San Antonio. The tempurature is barely above freezing and the rainy just leaves you feeling chilled through and through. I have my longhorn canes all reduced now and some beads and slices ready for baking. Started working on a UT cane, but ran out of white clay (always running out of white *sigh*) so I'll have to wait until the stores open at 10am to pick up more.....which means going out in the cold, messy, icky day. I should have some pics of beads and a few earrings ready to photograph later today - if there is any light to photograph by that is. lol Y'all take care and stay safe!

Wednesday, February 10, 2010

Blue Rock Bracelet

This bracelet is just classy! This is from Michele's Art Jewelry's Primitive Earth Series. Michele Norine's Primitive Earth Series is filled with browns and oranges and bold designs and rough textures - many of which also have almost an african or oriental flare to them. They are stunning! BONUS - this bracelet has matching earrings which are sooooo cool. Michele's work is bold and unique. She incorporates lots of natural elements into her work - bone, leather, semi-precious gems. She is truly an artisan and her pieces are statements that will last generations! You can view more of her work HERE and please look for more of the wonderful artisans of PCAGOE!

This bracelet is one of a kind, so look quickly!

Well, on a personal note - it's cold and sleeting in San Antonio today. Even the air in the house has a bite to it. My space heater is feeling abused. lol My UT canes are coming along as you can see. I was thinking of framing them in black, but I think I'll just stick with the burnt orange and white and then use white beads as accents - since it's hard to find burnt orange beads. lol My next cane with be the letters UT in white with the burnt orange background. Hopefully I'll have some pieces done by the weekend.

Stay warm everyone! The country seems filled with icky cold stuff.

LinkWithin

Related Posts with Thumbnails