Saturday, February 27, 2010

Whispering Secrets


Whispering Secrets
Originally uploaded by laurabeestudios

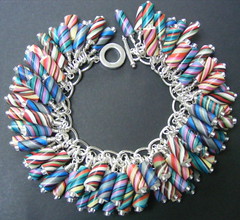
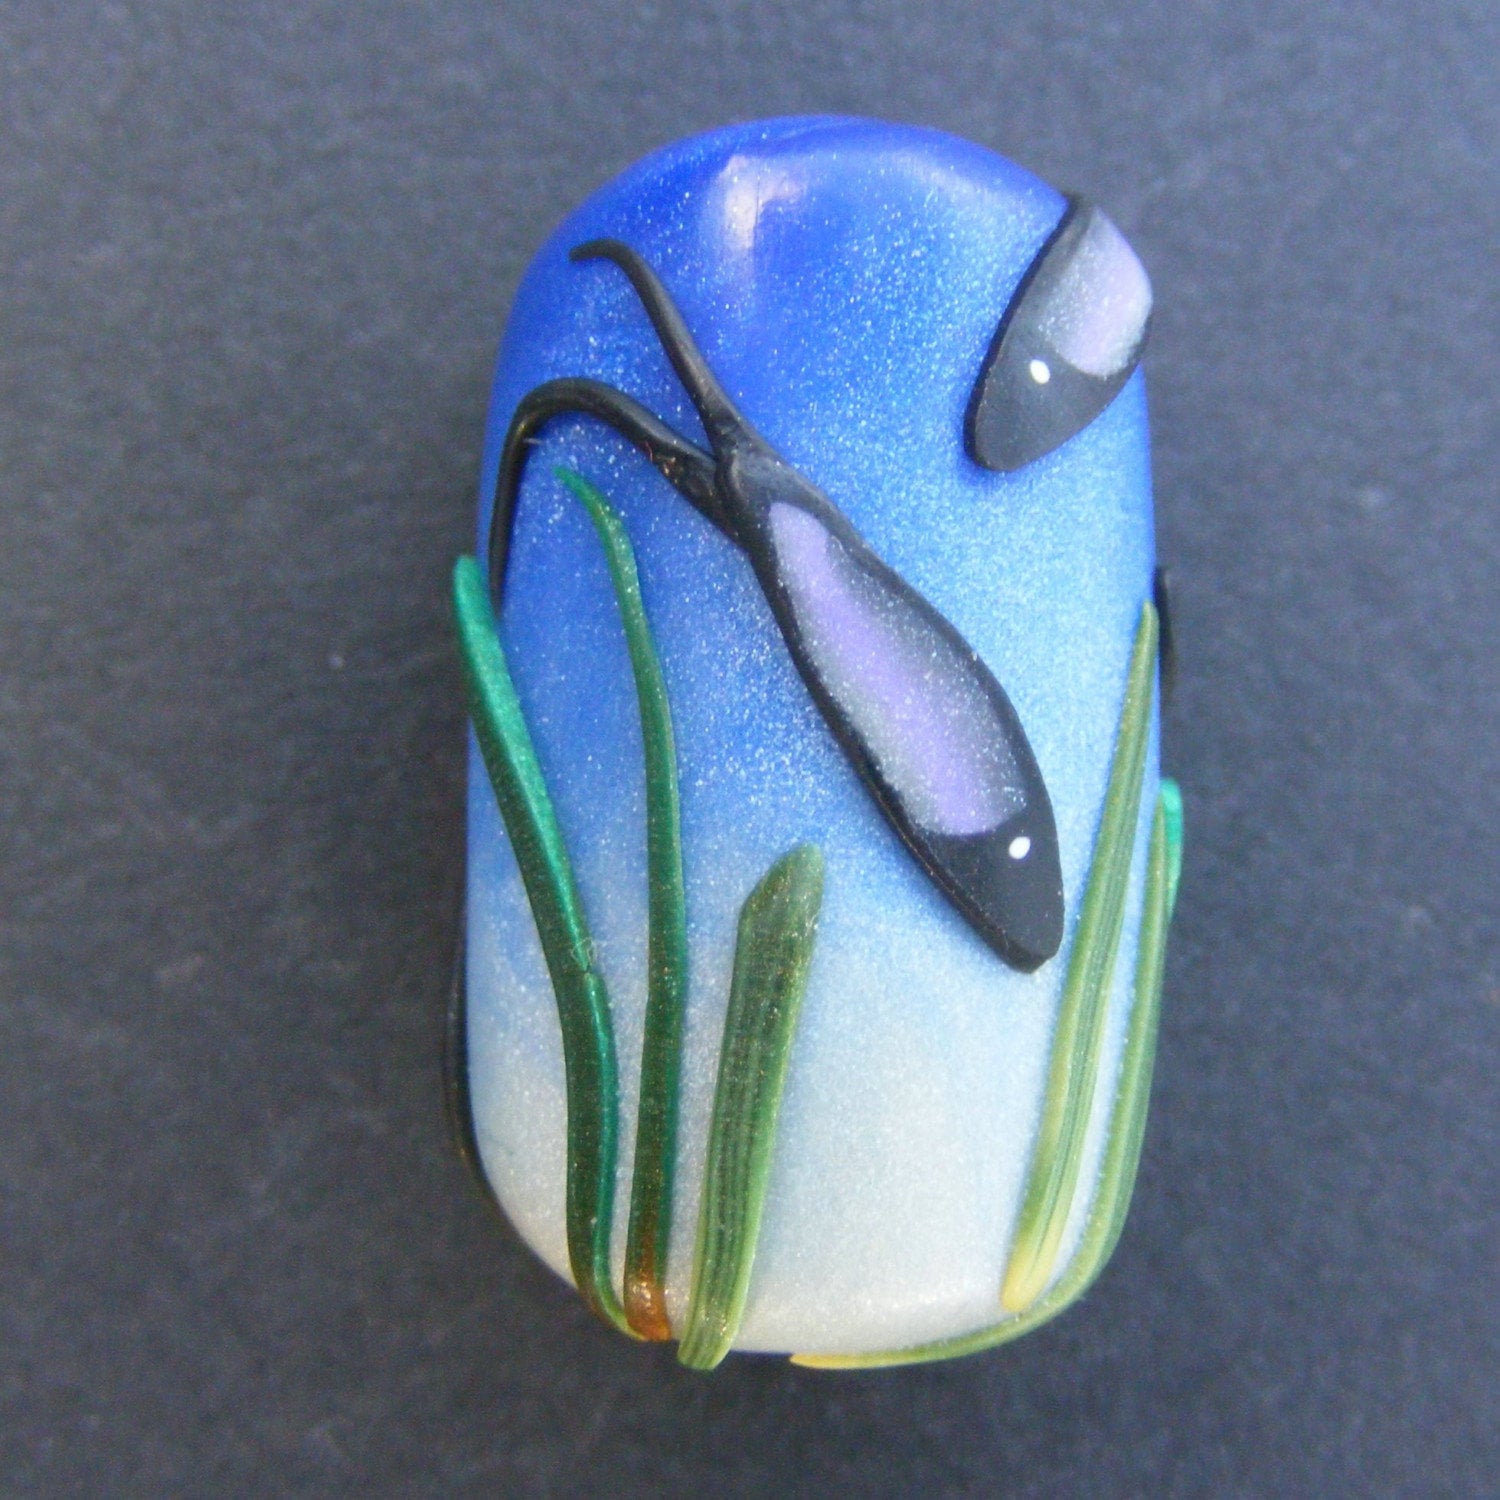
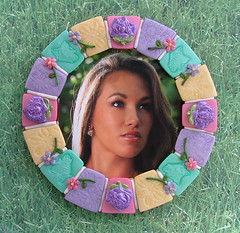
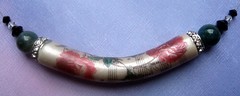
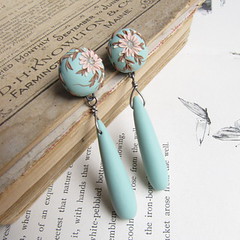
Laura Boner Leidy, also known as Laurabee, is so outstanding in her detail work! Her jewelry is so delicate and reminds me of the wonderful handcrafted ribbon work and embroidery that you might see on old doilies and tablecloths.... a artform in itself that is becoming almost extinct (My mother finds every piece she can find at auctions etc for myself and my children's hope chests because it's disappearing). Her work always brings out memories in me - like this piece. The colors such a soft greenish blue - reminding me of finding faded robin egg shells in the yard in the spring when life is renewing itself. Laura is an true artist and her pieces are soft, feminine and nostalgic. You can find more of her work at her ETSY shop HERE or her shop on 1000 Markets HERE. You can also follow her on her blog at http://www.laurabeestudios.blogspot.com or at her Facebook Fanpage HERE.

Laura is also a valued member of
PCAGOE. Her work is to be treasured - I always enjoy looking at every new piece!

Linda's feature ArzuMusa's feature

Ok - I got this stupid silly smile on my face and just can't get rid of it. AND
Linda Riopel and Arzu Musa - it's all YOUR FAULT! Thank you for your kind words in you blogs and for all the kind words that all my new friends have posted in response! I feel like I've found a new family and will strive to live up to the kindness all of you have shown me. THANK YOU!

Now I'm off to work on my new mystery project! *hugs all*

Friday, February 26, 2010

My cat on a box!


My cat on a box!
Originally uploaded by ClayCenter

Berit Hines makes covering tins look easy and trust me - it's not! This beauty has a polymer clay image of her cat, Charlie and it's MAGNIFICENT! Berit is another friend from the PCAGOE and along with being a very gifted artist, is always there to help her fellow guild members with words of wisdom, encouragement, and a sense of humor. Her SHOP is filled with the most wonderful covered tins, pens, wine stoppers and pendants all made from millefiori canework that is exceptional! She - like myself - dabbles in the fine arts and also has a store at Imagekind where you can purchase her watercolors.

A very talented lady is so many respects! Grab a little tin as a special way to 'wrap' a special trinket for that special person in your life! No one can resist 2 gifts in one!

While out doing my daily chasing yesterday, one person I had an appointment with happened to be a UT graduate and I was wearing one of the new bracelets I made ...and had some other items in my purse (I always try to keep a little showcase on hand - just in case). Well, I gotta make a few more now, but that's good reason for a "HAPPY DANCE!" =) I got my next zodiac cane started and will be finishing that up today and moving on to making my surprise that I hope will be finished in time for the challenge. UG ....need more coffee and more hours in the day! The picture above is a necklace set with my face covered beads. Kind of a blast from the past with some ETSY listings from a few months ago before I got this blog up and running. You can find it HERE.

The sun is shining - it's supposed to be 65 today after sleeting on Tuesday! I'm soo ready for spring! Keep smiling, everyone!

Thursday, February 25, 2010

Lantern for Tealight


Lantern for Tealight...
Originally uploaded by Arzu Musa

Arzu Musa reminds me that polymer clay is an international art form. She is from Istanbul, Turkey and her wonderful lanterns and candle holders just glow! It reminds me how wonderful the polymer clay community is at breaking down the barriers across this great world of ours. Arzu Musa's SHOP is filled not only with these wonderful lanterns, but also with handmade buttons, barrettes, jewelry, beads and hair combs - all with an earthy style that is all her own. You can find out more about her work at www.arzumusa.com.

Arzu Musa was one of the first people to add me as a contact back when I started this whole venture into refinding myself and my art back in November of last year and one of the first to not only find me on Facebook when I broke down and joined it, but also join my Fan Page. The polymer clay community is one of the most creative and supportive that I've encountered and my fellow members of PCAGOE touch my heart daily.

It's going to be a hustling bustling day filled with chasing for me, but hopefully I'll get some times to check out the PCAGOE forums for their weekly Clay & Play Thursday posts. It is wonderful to see what everyone is up to and they inspire me daily to not only try new techniques, but also improve my detail, design, packaging, and perspective. For instance - right now I'm working on some fun cha-cha bracelets with various school beads - an inspiration from several sources in the guild. They are a blessing! I'll throw up pictures of the result when I get it done - for now here is a picture of a necklace I threw together from left over marbled clay and chalk turquoise! Polymer Clay definitely appeals to my frugal side - NO WASTE!

Stay happy! Count your blessings, too!

Wednesday, February 24, 2010

Carnival


Carnival
Originally uploaded by Pips Jewellery Creation

When I first saw this bracelet, I caught my breath! The beadwork is marvelous, the shine is just incredible, and the amount of time it would take to give such attention to all those fabulous colorful beads....Pippa said it was a labour of love and it was truly worth it! Pips Bath is from the United Kingdom and her Jewelry and beads are just fabulous. Her attention to detail rivals anyone I've seen. Check out the bitty fish in these beads!!! I very much encourage you to check out her store HERE and if you like her work (and I know you will) you can follow her blog at http://pipsjewellery.blogspot.com.

Her work is one of a kind and I truly feel she's one of those up & coming artists whose work will be admired by many and very soon! Enjoy! I know I do!

Ok, so the house is clean now and Bunco is over and done.... and my feet hurt. =) All in a good day's work, right? I've been lovingly caressing my coffee cup as the tempuratures hover just below freezing outside - space heater and electric blanket close at hand. So what do I do with my day today? There is several things topping my list. 1) This month's PCAGOE challenge 2) Making more face canes for new face beads and designs (I have a request for a 'grandmother' style bead - maybe it's time to play around with adding spectacles) which would include photo journaling and writing up a tutorial for clay lessons (big project) 3) Working on an Aries cane for some more zodiac jewelry. At least those are the items on my polymer list =) So many more on the omghousebillskidsclasses list - you know the one I mean!

ALSO - I'm going to be doing a special blog promotion. For anyone that orders anything from either of my etsy shops (JEWELRY or DESIGN) I'm going to be throwing in a free poster. Just write POSTER in the message area when you place an order or send me a conversation or email mentioning it. I had these posters done of my Gecko Charmer cut paper mosaic some years ago and they are a limited edition print that are signed and numbered. The image at the right is a photoshop recreation of the design, the poster colors may differ slightly. The offer is good while supplies last. =)

Tuesday, February 23, 2010

Shania Walking Hermie in the Park

Wandie Ortiz is a fabulous artist!. When I saw this, my first thoughts were of children's books and the wonderful claymation holiday shows I used to watch as a child. I've done some sculpture with polymer clay and it's just a wonderful medium to use to try to express that 'hands on' desire to create. Wandie's works remind me of that. Her store is filled with wonderful creations that speak of nature and earth with colors warm and rich. Wandie is also a member of PCAGOE. Her website is www.wandieortiz.com and you can find her wonderful jewelry HERE.

Her jewelry designs are warm and elegant. Take time to look!

OMG - BUNCO TONIGHT! Whenever I have something like this I always panic about cleaning even when I know the house is probably clean enough. Mostly though, I just have to pick up my clay & bead mess from everywhere it gets scattered when I'm in the throws of working on a new design.....I'm sure no one knows what I'm talking about. lol Here is a picture of a new 3 strand bracelet that I just listed last night. Finding burnt orange beads can be a challenge, but I like what I came up with! Stay safe, stay warm, stay happy!

Monday, February 22, 2010

Picture Yourself In Spring

The colors in this just yell, "SPRING!" I love this mirror created by Angela Hickey aka Polymer Clay Creations! She has wonderful detail in every panel with embossing and mica shifts, molded flowers, and micro beads for added sparkle! What a lovely creation! I can picture this hanging on the wall in some young girls bedroom so she can check her hair before she heads off to school! Angela is also a member of PCAGOE and is a wonderful source of inspiration to the guild. She is always helpful and her millefiori work is outstanding! You can find everything from jewelry to covered tins and wine bottle stoppers in her shop HERE or check out her new blog at http://www.polymerclaycreations.blogspot.com. If your on Facebook, you can join her Fan page HERE. =)

Angela's work is so full of color and life - her shop is just fun to look at! Please take a peek.

Today is going to be a clean the house day for me as I prepare to host some of my long time lady friends tomorrow night for Bunco. It's my monthly excuse to kick back, forget the stress, and have a few glasses of wine. I've been working on more new UT designs - beaded bracelets and earrings. I'll probably manage to post some more to Etsy today or early tomorrow. I spent a huge chunk of time last night picking up beads my cat had flipped onto the floor - ug! Hope y'all are having a good monday. The sun is shining here and I think it's a good day to turn the music up loud and CLEAN! Dancing with the vacuum cleaner is always cathartic!

Saturday, February 20, 2010

Lots of Girls


Lots of Girls
Originally uploaded by AliceStroppel

Alice Stroppel's faces are so fun and lively and colorful. I admire her work so very much and love how her faces differ so much from those I create. Again, I am always amazed at polymer clay as an art form because these beautiful bracelets are truly works of art. When I started my more 'serious' trend taking my polymer clay work online back in November of last year, Alice was one of those artists whose work keep inspiring me and still does. And someday I need one of these pieces just to remind myself of what we can do with our dreams. =) Thank you Alice. You can find more of Alice's work HERE and follow her at her blogs at http://www.polymerclayetc.com and http://www.thefigurativeartbat.com,


I truly think every woman needs something like this just to remind them of how colorful, wonderful, and meaningful being a woman can be. Check out her shop, it's well worth it!

Here is a quick photo of a finished UT Chain Bracelet that I just finished listing on my Etsy shop. (HERE) As for me - well today is a day of lunch out, a date with a friend and then maybe some jewelry work in the evening over a glass of wine. It's saturday and so far my day has been wonderful and magical. I do hope everyone here has a wonderful and magical weekend, too.

Friday, February 19, 2010

Classic Elegance

Image transfer is a polymer technique that I have played with only sparingly, but Linda Riopel has it DOWN! The beautiful focal bead on this lovely piece is made of polymer clay and the rose and music design is then transferred onto the clay before it is cured. And the results are breathtaking. I love the simplicity of this design and the curve. It's a wonderful piece that can be subtle and worn with most necklines, but at the same time very eye-catching! And the roses are so wonderful for spring, easter, and mother's day gifts! Linda is another cornerstone member of PCAGOE. Not only is her jewelry amazing, but she also is so very helpful and wonderful. She makes PCAGOE feel like a home. You can find more of her wonderful creations HERE or follow her blog at http://www.nkdesignslindariopel.blogspot.com.

Linda makes very wonderful one of kind pieces! Go get yours today!

The sun has been shining and life is wonderful. I have so many good things going on in my life and so many wonderful people - including a few new ones that have become very dear to me. PLUS yesterday I found out that my work will be featured in the reader's gallery in an upcoming issue of Polymer Clay Cafe and on doing some research on google, I discovered that my Piano Girl painting on Imagekind has been hitting the top pages on the popular tab regularly since I uploaded it! It even reached the #1 spot on page 1 at one point! I guess I need to take up my paint brushes again soon! I've gotten my UT cane reduced and some beads cured, so tomorrow you'll get to see some additional pieces. Tonight I have my friday night class with my young students - we've been working on some clay sculptures (see photo of their bunnies above) and are currently doing a clay seal. They do fabulous work for being in 5th grade and have so improved in the 9 months that i've been teaching them everything from sculpture to perspective to drawing to color & painting. Art is such a joy to learn. And I learn so much from teaching them, too!

Wednesday, February 17, 2010

Making a UT Cane - photo journal

Ok, this is a first for me, so please, please post any suggestions, comments, improvements, etc and let me know if I'm explaining things clearly. Thank you all in advance!

Supplies
White Clay (I used a mix of Premo, Sculpey III, and Kato for this - about 9 blocks total)
Orange Clay (I used Premo Orange and Sculpey III Sweet Potato - about 12 blocks)
Brown Clay (one block each of Premo Burnt Umber and Sculpey III Terra Cotta)
A long tissue blade or clay blade
A pasta machine

1) First off, prep the clays. Mix and condition the white first and set it aside rolled out in large sheet on the #1 setting on the pasta machine. Then mix the burnt orange clay in the following ratio: 1 block Premo Orange, 1 block Sculpey Sweet Potato, 1/8 block Premo Burnt Umber, and 1/8 block Sculpey Terra Cotta.

2) Stack sheets of burnt orange clay 4 high (#1 setting) and trim them to a height of 4". Lay them out on end in the center part of the 'U' and trim the top even with the lower edge of the bars on the top of the 'U' and shave the bottom with your clay blade to match the curve of the 'U'. Add a small 2 sheet stack (also 4" high) to fit between the bars on the 'U'.

3) Stack 3 large sheets of white clay and trim them to a height of 4". Wrap the sheets of white clay around the burnt orange center and trim the clay to the lower edge of the bars on the 'U'. See Above.

4) Make your bars on the top of the 'U' using your 3 sheet stack of white. Press a flat edge up against the burnt orange bar you made in step 2 and cut it to size with your clay blade carefully or measure the width needed and cut to size then press in place against the center orange bar. Repeat for the opposite side.

5) Score cutting marks on the top and sides of your cane from your pattern where the top and bottom edge of the 'T' bar meet the sides of your cane and where the stem of the 'T' comes out on the bottom of the cane. See Above.


6) Carefully trim away the scored area where your 'T' will go using firm pressure and a slight sawing motion. Once you have your sections divided, carefully clean up the edges with your blade making sure they are flat, even and parallel. Do not press or distort the individual pieces or your design with no longer line up.

7) Smooth the flat edges carefully to avoid air bubbles when you reassemble your cane. Set your trimmed pieces back on your pattern to make sure the pattern still lines true. Gentle mold it back into alignment if it doesn't. Now go get another cup of coffee. =) WAIT...that's a good idea....brb.

8) Ah...coffee.... Ok, now back to your 3 sheet stack of white trimmed to 4" height. Place your white sheet stack to fill the gap for the upper bar of the 'T'. Trim it even with the sides and press the top firmly against it while avoiding any distortion.

9) Place your white sheet stack between the two bottom cane sections for the stem of the 'T'. Trim it flat on the top and let the stem extend down past the bottom for now. Line up the bottom part of the cane with the top section and firmly press it in place making sure that the edges are even and all the lines still line up. See Above.

10) Measure and cut your two side bars for your 'T' from your stacks of white clay and place on the sides, making sure you line up the top edge of the side bars with the top edge of the 'T'. Press firmly into place. Carefully score the stem of the 'T' at the bottom of the cane where it meets the top edge of the bottom bar, then trim away the excess clay. Make sure your bottom edge is smooth and even to avoid air bubbles.

11) Carefully fill the section between the side 'T' bars and the bottom stem with sheets of orange clay. Layer and cut the sheets to size, smoothing as you add them to avoid trapping air. If you do trap air, use a fine needle to pierce the clay and smooth the hole closed. Build up the clay one sheet at a time, sealing the edges to the bar and stem until the clay is higher than the bottom stem, then use your clay blade to trim the bottom edge flat. Measure your bottom bar from your 3 sheet stack of white clay and press it into place.

12) Finish filling the remainder of the cane with orange clay until you reach your desired size. You can use layers of sheets like I did or use rolls or blocks and press them into place. Just be careful when adding additional clay to avoid distortion of your design if the clay of the design is still softer than the clay you may be adding. For my cane, the finished dimensions were 3.75 x 3.75" with a height of 4". Now it's time to reduce (but more coffee first)!

Thank you all for reading! Again, please post any comments, corrections, or suggestions. I'll post photos of the finished pieces once I get that far. =) Have a great day!!!

Tuesday, February 16, 2010

Lynda's Fabulous Faux


LOOK AT ALL THIS! Lynda Moseley is as creative as she is generous! This is some of her more recent faux gemstone work, but her image transfers, embossing, and various other creations are just as lovely and so classy and sophisticated ....well, who wouldn't want them? Lynda is one of the cornstones of the PCAGOE and it always helping out with advice, donations to causes and support with team promotions. You can find more of her work HERE and she also has a wonderful blog at http://www.scdiva.blogspot.com.

PLEASE check out her shop, you won't regret the visit. Her work is fabulous!

Well, I sat down with girls and watching Harry Potter saturday night and while sitting enjoying the show, I threw together a few odds & ends pieces from some beads I'd made cleaning up my workspace and using up clay left over from other projects. Nothing terribly fancy, but throw together with some chalk turquoise and some colorful pick glass beads, they make a nice presentation. Ok, back to work! The sun is shining!

Monday, February 15, 2010

March PCAGOE Challenge Prize Pool

LOOKIE AT THE NEW GOODIES! Vote for your favorite entry in the March PCAGOE Challenge, the theme of which is "Texture" between March 1 and March 7 and you could win one of these beautiful polymer clay prizes created by our talented member artists! Vote at www.pcagoe.com

1st Row, L-R: StudioSChiek, PolymerClayCreations, ClayCenter, KDollDesigns
2nd Row, L-R:
NKDesigns, RenGalSA (omg - that's ME), AshPaints, BeeTreeByMe
3rd Row, L-R:
11BoldStreet, AlisonEKurek, RiverValleyDesign, LaurelSteven
4th Row, L-R:
Juliespace, JanGeisen, ClayHappy, SCDiva

Yes, that's right! One of my pins is included in the prize pool this month! Make sure you vote!


Well I got some lovely new Longhorn Jewelry posted on my Etsy Store! I've been working on a UT cane now and am almost done. I've been photo-journaling it so you'll get to see all the various steps! Hope everyone had a wonderful Valentine's Day.

Friday, February 12, 2010

Polymer Clay Pen

This wonderful clay covered pen and stand come from Kelly Feeney of Kellyplaysclay. Kelly has been an inspirations to me since joining PCAGOE with all her hard work and her wonderful attitude. She's always there with a encouraging word and a chipper wit. I wish I could bottle her enthusiasm for my own personal pick me up. =) Her shop is a floral bouquet! You'll find not only lovely pens like this one, but barrettes, pony tail holders, and the most adorable decorated sugar packet holders! Kelly is a busy mom like I am, so I admire her dedication most of all! You can find Kelly's shop HERE and more info about PCAGOE at www.pcagoe.com.

The pen set would be a wonderful gift for any mother, teacher, or mentor. Give Kelly a look!

Oh, it's Friday isn't it! Well, the gloom here is supposed to break but it's still very cold. I've been hovering near my space heater as I work - with my cat and dog not far away enjoying the extra heat, too. Today I should have enough light to do some photojournaling while I'm making my UT cane then I plan on posting it as a kind of 'how to' this weekend or early next week. Y'all are my guinea pigs for developing my own tutorial writing style. Here is a fun picture of some of my longhorn beads fresh out of the ice bath. I'll probably do some quick earrings this morning while waiting for sunshine to light up my work area a bit more for picture taking. Have a great day, everyone!

P.S. I've just started a fan page on Facebook. Please feel free to become a fan HERE so I can keep you up to date with any new shop items or promotions! Thank you!

LinkWithin

Related Posts with Thumbnails